iOS10通知適配__iOS SDK手冊_App SDK 手冊_移動推送-阿裏雲
1. iOS 10通知簡介
iOS 10係統對推送通知做了較大增強,遠程推送通知相關主要體現在以下幾點:
- 統一通知相關的API和Framework;
- 通知注冊和回調接口修改;
- 通知內容更豐富,支持富媒體(圖片、音頻、視頻等)推送;
- 通知詳情自定義UI;
總的來說,iOS 10提供了更簡潔易用的通知相關接口,提高了處理通知的自由度。
阿裏雲移動推送對iOS 10通知相關feature配置,通過OpenAPI高級推送接口配置,請參考OpenAPI推送高級接口。
閱讀本文檔時,可參照iOS推送Demo中iOS 10通知相關的代碼進行學習和試用。
2. Framework依賴
UserNotifications.framework,iOS 10通知相關類和接口都包含在內;- 引用如下:
#import <UserNotifications/UserNotifications.h>
3. 通知字段
- 原本iOS通知僅支持設置通知內容,可通過OpenAPI的
Summary字段設置,參考OpenAPI推送高級接口字段,老版本服務端推送通知payload字段如下:
{"aps": {"alert": {"your notification body",},"badge": 1,"sound": "default",},"key1":"value1","key2":"value2"}
- iOS 10通知支持設置
標題(title)、副標題(subtitle)、內容(body)、通知擴展字段(mutable-content)、通知類別(category),服務端配置參考上述的OpenAPI推送高級接口,當前服務端推送通知payload字段參考如下:
{"aps": {"alert": {"title": "title","subtitle": "subtitle","body": "body"},"badge": 1,"sound": "default","category": "test_category","mutable-content": 1},"key1":"value1","key2":"value2"}
【注意】使用OpenAPI推送時,若沒有進行iOS 10通知相關配置,通知payload保持老版本不變,已經保證對老版本payload兼容性;若進行iOS 10通知相關配置,請確保客戶端業務邏輯對payload相關字段處理的兼容性。
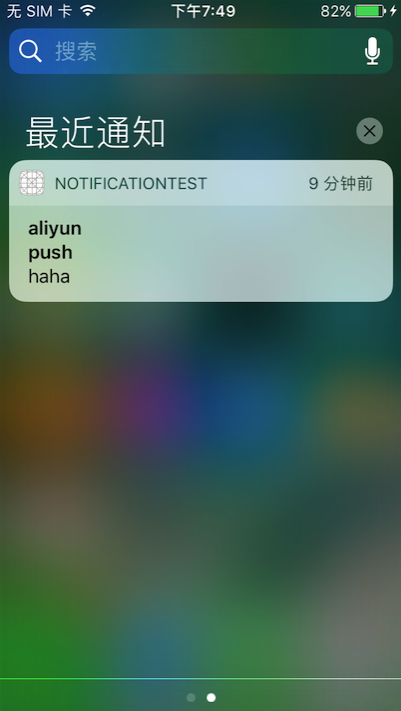
iOS 10設備收到通知效果如下,其中
標題為”aliyun”,副標題為”push”,內容為”haha”。title設置後,iOS 10+係統顯示title如下;【iOS 8.2 <= iOS係統 < iOS 10】,通知應用名稱會顯示該標題。
4. 通知中心
4.1 簡介
- 基於
UNUserNotificationCenter對象進行通知的調度和管理通知相關的行為,具體如下:- 為通知的提醒、聲音和角標請求授權;
- 聲明通知類別和可執行動作;
- 管理通知的彈出;
- 管理通知在設備通知中心的展示;
- 獲取App通知相關的配置。
- 通知中心對象獲取方式如下:
UNUserNotificationCenter *center = [UNUserNotificationCenter currentNotificationCenter];
4.2 請求授權並向APNs注冊
- App使用推送功能前,需要向用戶請求推送功能授權,如下所示;
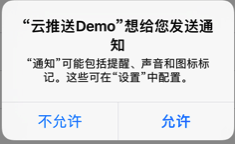
- 第一次調用
requestAuthorizationWithOptions請求授權時,App會彈出如下圖所示的授權框,注意App卸載重裝前該授權框僅彈出一次,若用戶點擊“不允許”,需要引導用戶到“設置”中打開,推送功能才能正常使用。
requestAuthorizationWithOptions回調中可捕獲用戶是否點擊授權,在成功授權回調中調用registerForRemoteNotifications,向APNs注冊獲取設備的deviceToken,App再次啟動時雖然不會彈出授權框,但推送授權請求可獲取App推送配置,可觸發成功/失敗授權回調。- APNs注冊成功/失敗回調保持不變,在成功回調中調用阿裏雲推送SDK接口,將deviceToken上報到阿裏雲推送服務器。
- 主動調用
getNotificationSettingsWithCompletionHandler接口,回調中可獲取App推送授權狀態。
UNUserNotificationCenter *center = [UNUserNotificationCenter currentNotificationCenter];if (systemVersionNum >= 10.0) {center = [UNUserNotificationCenter currentNotificationCenter];[center requestAuthorizationWithOptions:UNAuthorizationOptionAlert | UNAuthorizationOptionBadge | UNAuthorizationOptionSound completionHandler:^(BOOL granted, NSError * _Nullable error) {if (granted) {// grantedNSLog(@"User authored notification.");[application registerForRemoteNotifications];} else {// not grantedNSLog(@"User denied notification.");}}];/** APNs注冊成功回調,將返回的deviceToken上傳到CloudPush服務器*/- (void)application:(UIApplication *)application didRegisterForRemoteNotificationsWithDeviceToken:(NSData *)deviceToken {NSLog(@"Upload deviceToken to CloudPush server.");[CloudPushSDK registerDevice:deviceToken withCallback:^(CloudPushCallbackResult *res) {if (res.success) {NSLog(@"Register deviceToken success, deviceToken: %@", [CloudPushSDK getApnsDeviceToken]);} else {NSLog(@"Register deviceToken failed, error: %@", res.error);}}];}/** APNs注冊失敗回調*/- (void)application:(UIApplication *)application didFailToRegisterForRemoteNotificationsWithError:(NSError *)error {NSLog(@"Get deviceToken failed, error: %@", error);}// 主動獲取設備通知是否授權(iOS 10+)- (void)getNotificationSettingStatus {[center getNotificationSettingsWithCompletionHandler:^(UNNotificationSettings * _Nonnull settings) {if (settings.authorizationStatus == UNAuthorizationStatusAuthorized) {NSLog(@"User authed.");} else {NSLog(@"User denied.");}}];}
4.3 Action和Category
- iOS 8以上支持,此處僅講述iOS 10係統的實現方式。
- 通知支持設置
Action點擊動作,即在通知上添加按鈕,點擊按鈕可觸發回調以此做出不同的邏輯處理; - 通知支持
Category分類,可將Action和Category進行關聯,Category和第6節(通知詳情自定義UI)相關。 - 下麵代碼自定義id為
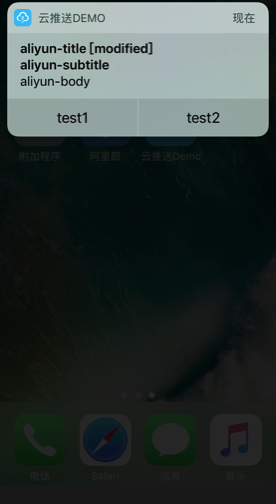
action1和action2的通知動作,創建id為test_category的通知類別後,將兩個Action關聯到該category,最後注冊category到通知中心。 - 使用OpenAPI推送通知時,調用
setiOSNotificationCategory()接口,可指定通知的類別;創建的test_category類別的通知彈出時如下圖所示,test1和test2按鈕分別對應id為action1和action2的通知Action; - 【注意】
Category注冊到通知中心需要在推送前完成。
/*** 創建並注冊通知category(iOS 10+)*/- (void)createCustomNotificationCategory {// 自定義`action1`和`action2`UNNotificationAction *action1 = [UNNotificationAction actionWithIdentifier:@"action1" title:@"test1" options: UNNotificationActionOptionNone];UNNotificationAction *action2 = [UNNotificationAction actionWithIdentifier:@"action2" title:@"test2" options: UNNotificationActionOptionNone];// 創建id為`test_category`的category,並注冊兩個action到category// UNNotificationCategoryOptionCustomDismissAction表明可以觸發通知的dismiss回調UNNotificationCategory *category = [UNNotificationCategory categoryWithIdentifier:@"test_category" actions:@[action1, action2] intentIdentifiers:@[] options:UNNotificationCategoryOptionCustomDismissAction];// 注冊category到通知中心[center setNotificationCategories:[NSSet setWithObjects:category, nil]];}
4.4 通知回調
UNUserNotificationCenterDelegate協議定義了通知相關的回調;
4.4.1 設置代理
- 若要處理通知相關回調,需要實現並指定通知中心對象
UNUserNotificationCenter的代理UNUserNotificationCenterDelegate,一般是在AppDelegate中實現,如下所示:
@interface AppDelegate () <UNUserNotificationCenterDelegate>@end@implementation AppDelegate...UNUserNotificationCenter *center = [UNUserNotificationCenter currentNotificationCenter];center.delegate = self;...@end
4.4.2 回調1:App在前台收到通知
- 當App處於前台,收到通知會觸發
userNotificationCenter:willPresentNotification:withCompletionHandler:回調; - 在回調中可以處理通知相關的字段信息,回調處理結束前需要調用
completionHandler(UNNotificationPresentationOptions),UNNotificationPresentationOptions的參數含義如下:UNNotificationPresentationOptionNone,通知不提醒;UNNotificationPresentationOptionSound,通知聲音提醒;UNNotificationPresentationOptionAlert,通知內容提醒;UNNotificationPresentationOptionBadge,通知角標提醒。
- 基於此,App在前台時也可以將通知彈出。
/*** 處理iOS 10通知(iOS 10+)*/- (void)handleiOS10Notification:(UNNotification *)notification {UNNotificationRequest *request = notification.request;UNNotificationContent *content = request.content;NSDictionary *userInfo = content.userInfo;// 通知時間NSDate *noticeDate = notification.date;// 標題NSString *title = content.title;// 副標題NSString *subtitle = content.subtitle;// 內容NSString *body = content.body;// 角標int badge = [content.badge intValue];// 取得通知自定義字段內容,例:獲取key為"Extras"的內容NSString *extras = [userInfo valueForKey:@"Extras"];// 通知打開回執上報[CloudPushSDK handleReceiveRemoteNotification:userInfo];NSLog(@"Notification, date: %@, title: %@, subtitle: %@, body: %@, badge: %d, extras: %@.", noticeDate, title, subtitle, body, badge, extras);}/*** App處於前台時收到通知(iOS 10+)*/- (void)userNotificationCenter:(UNUserNotificationCenter *)center willPresentNotification:(UNNotification *)notification withCompletionHandler:(void (^)(UNNotificationPresentationOptions))completionHandler {NSLog(@"Receive a notification in foregound.");// 處理iOS 10通知相關字段信息[self handleiOS10Notification:notification];// 通知不彈出//completionHandler(UNNotificationPresentationOptionNone);// 通知彈出,且帶有聲音、內容和角標(App處於前台時不建議彈出通知)completionHandler(UNNotificationPresentationOptionSound | UNNotificationPresentationOptionAlert | UNNotificationPresentationOptionBadge);}
4.4.3 回調2:點擊/清除通知
- 點擊/清除通知時, 可在
userNotificationCenter:didReceiveNotificationResponse:withCompletionHandler:回調裏捕獲到這些動作,根據UNNotificationResponse.actionIdentifier可對這些動作進行區分:- 點擊通知打開App,對應
UNNotificationDefaultActionIdentifier; - 左滑刪除通知,對應
UNNotificationDismissActionIdentifier,注冊Category時,需傳入UNNotificationCategoryOptionCustomDismissAction才可以捕獲到該動作,具體見4.3節的Category創建和注冊; - 點擊自定義Action,如點擊4.3節創建的id為
action1和action2的Action,自定義Action點擊動作的捕獲的好處在於,即使不進入App同樣可完成某些邏輯處理。
- 點擊通知打開App,對應
- 【注意】兩個通知回調是不衝突的,當App處於前台時,收到通知先觸發
userNotificationCenter:willPresentNotification:withCompletionHandler:回調;之後若有點擊通知動作,再觸發userNotificationCenter:didReceiveNotificationResponse:withCompletionHandler:回調。
/*** 觸發通知動作時回調,比如點擊、刪除通知和點擊自定義action(iOS 10+)*/- (void)userNotificationCenter:(UNUserNotificationCenter *)center didReceiveNotificationResponse:(UNNotificationResponse *)response withCompletionHandler:(void (^)())completionHandler {NSString *userAction = response.actionIdentifier;// 點擊通知打開if ([userAction isEqualToString:UNNotificationDefaultActionIdentifier]) {NSLog(@"User opened the notification.");// 處理iOS 10通知,並上報通知打開回執[self handleiOS10Notification:response.notification];}// 通知dismiss,category創建時傳入UNNotificationCategoryOptionCustomDismissAction才可以觸發if ([userAction isEqualToString:UNNotificationDismissActionIdentifier]) {NSLog(@"User dismissed the notification.");}NSString *customAction1 = @"action1";NSString *customAction2 = @"action2";// 點擊用戶自定義Action1if ([userAction isEqualToString:customAction1]) {NSLog(@"User custom action1.");}// 點擊用戶自定義Action2if ([userAction isEqualToString:customAction2]) {NSLog(@"User custom action2.");}completionHandler();}
5. 富媒體推送
- iOS 10添加了通知相關的擴展
Notification Service Extension,使得通知彈出前可以對通知內容進行修改。 - iOS遠程推送過程如下圖所示,APNs推送的通知直接在設備上彈出;

- 添加
Notification Service Extension後,如下圖所示,APNs推送的通知在彈出前,可先到達Extension進行處理,【注意】OpenAPI需要調用setiOSMutableContent(true)接口,這樣Extension才可生效。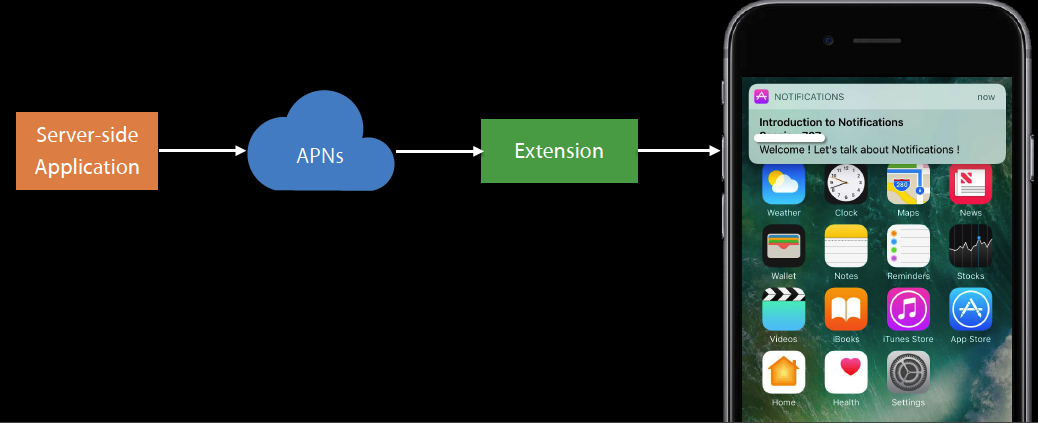
在
Service Extension後台預處理階段,可從遠程服務器下載或從本地獲取富媒體(圖片、音頻、視頻)資源,將其作為attachment添加到通知中,富媒體資源類型和大小限製如下: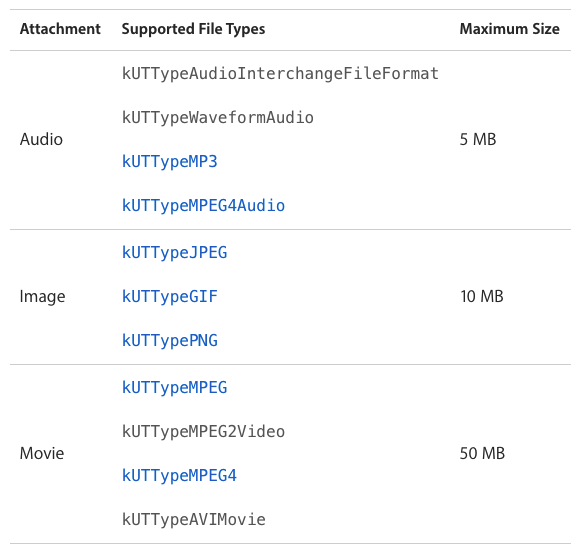
Notification Service Extension添加步驟:- Xcode -> File -> New -> Target,選擇
Notification Service Extension,如下圖所示:
- 輸入Target名,創建完成後在目錄下Xcode會自動生成
NotificationService的模板,在didReceiveNotificationRequest回調方法中,處理通知彈出前的動作。
- Xcode -> File -> New -> Target,選擇
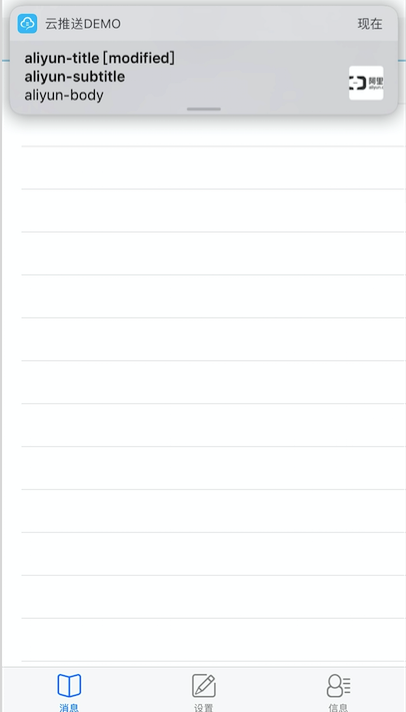
- 可參考iOS Demo Notification Service Extension的實現攜帶圖片的推送通知,從OpenAPI設定的自定義參數
attachment字段中獲取圖片Url,或者從本地獲取圖片資源,效果如下圖所示。 - 【注意】從遠程服務器獲取富媒體資源時,同樣需遵循App Transport Security (ATS)的原則,若需要請求HTTP資源請參考ATS配置,為
Service ExtensionTarget進行配置;建議限製為請求HTTPS資源。
6. 通知詳情自定義UI
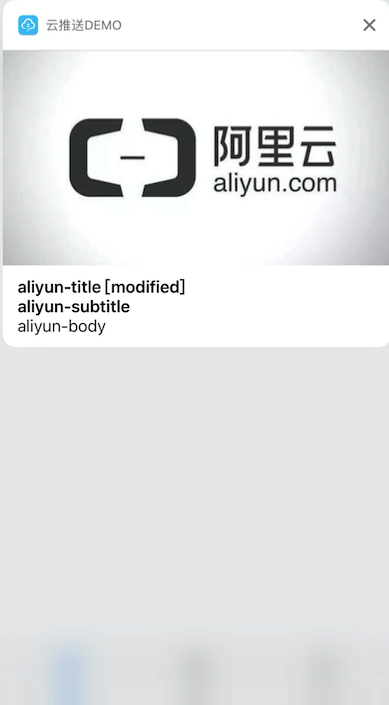
- 除了
Notification Service Extension,另一個通知相關的Extension為內容擴展Content Extension,可用於自定義通知詳情UI,如修改樣式、顏色等。 - iOS 10收到通知後,支持下拉通知(經測試iPhone 5c不支持,建議使用iPhone 6以上手機測試) or 3D touch展開通知詳情,攜帶圖片的通知詳情樣式默認如下圖所示,內容擴展可針對通知詳情進行定製。
- 內容擴展添加步驟:
- Xcode -> File -> New -> Target,選擇
Notification Content,如下圖所示: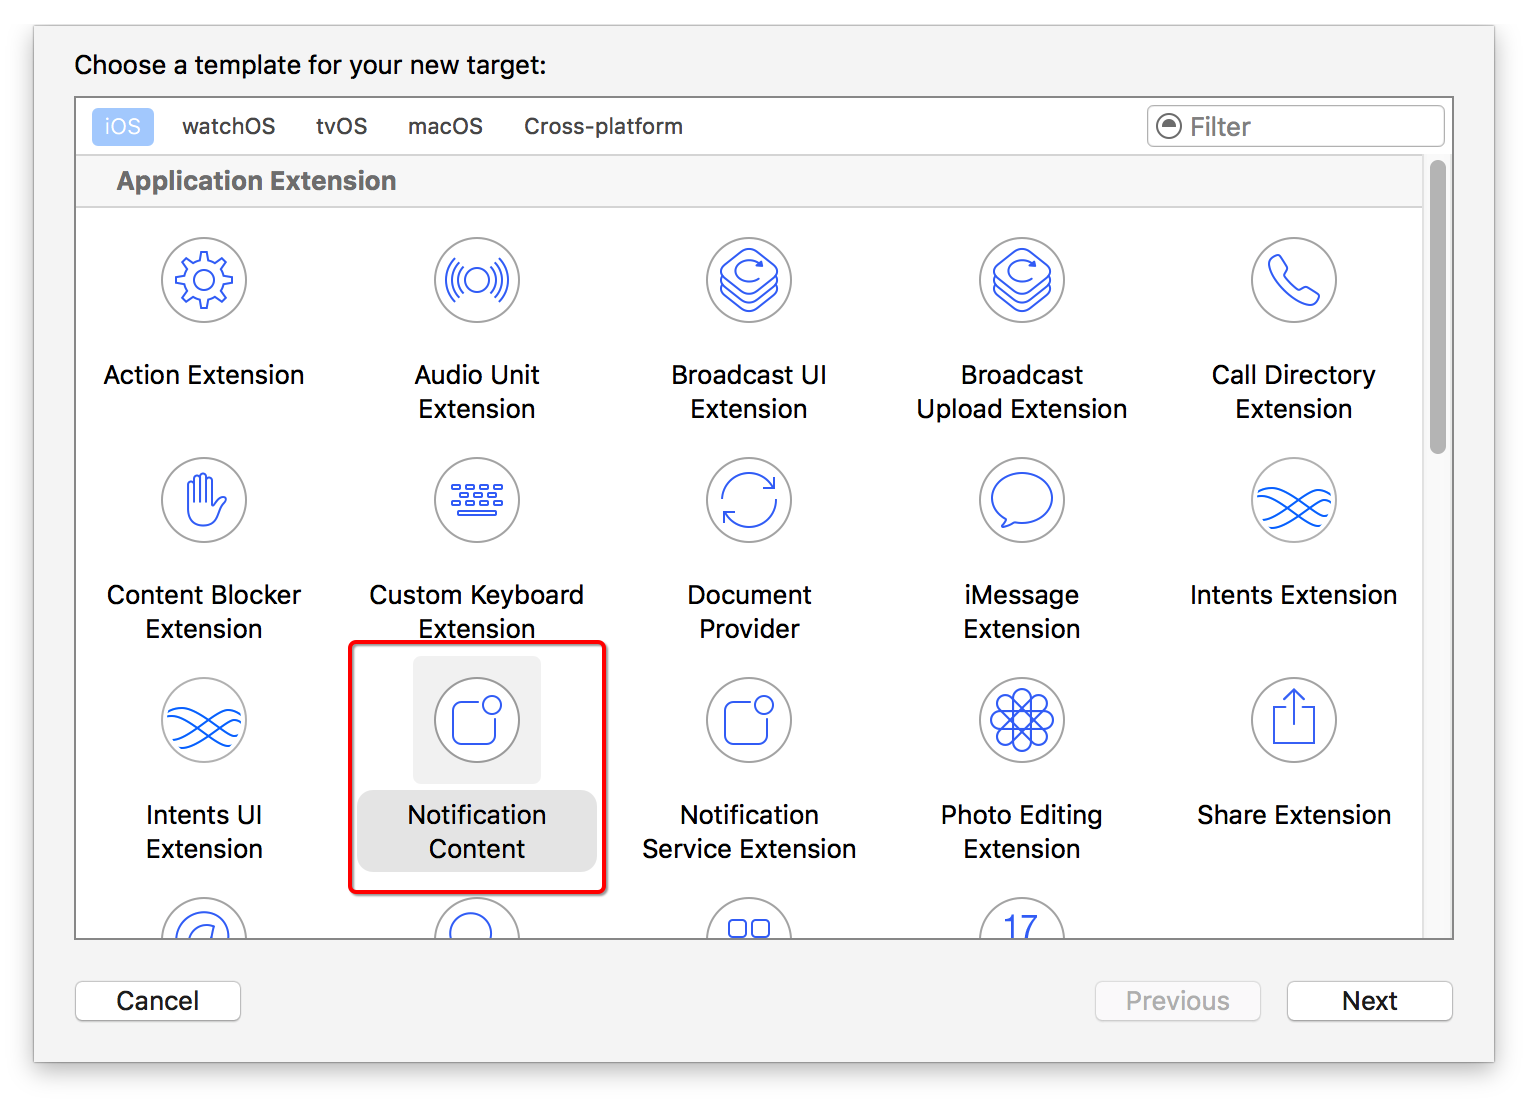
- 輸入Target名,Xcode自動生成
NotificationViewController頭文件和源文件,MainInterface.storyboard和Info.plist,其中NotificationViewController和MainInterface.storyboard一起定義了通知詳情的UI。 Info.plist中自動生成NSExtension相關KV配置,具體含義如下所示:- NSExtensionAttributes
- UNNotificationExtensionCategory,指定自定義通知詳情UI適用於哪些category,可為String or Dictionary;(必需)
- UNNotificationExtensionInitialContentSizeRatio,通知視圖長寬比例;(必需)
- UNNotificationExtensionDefaultContentHidden,原本通知內容是否隱藏,若不指定,默認為NO;(可選)
- NSExtensionMainStoryboard,storyboard文件名,默認填充為
MainInterface;(必需) - NSExtensionPointIdentifier,默認填充為
com.apple.usernotifications.content-extension;(必需)
- NSExtensionAttributes
- Xcode -> File -> New -> Target,選擇
- OpenAPI推送時,必需通過
setiOSNotificationCategory接口指定通知category,隻有指定的category在Info.plist的UNNotificationExtensionCategory設置,才能保證通知詳情自定義UI生效。 - 參考iOS Demo Notification Content Extension的實現方式,進行通知詳情自定義UI的設置,如下圖所示,綠色的
aliyun-body為自定義的展示UI,字段內容通過拷貝通知內容得來。

最後更新:2016-11-30 22:07:54
上一篇: iOS靜默通知__iOS SDK手冊_App SDK 手冊_移動推送-阿裏雲
下一篇: 推送使用場景__最佳實踐_移動推送-阿裏雲
- JAR 轉換 WAR__EDAS 中的 Dubbo 開發_開發者指南_企業級分布式應用服務 EDAS-阿裏雲
- Spark + MNS__Spark_開發人員指南_E-MapReduce-阿裏雲
- 如何使用代金券?___代金券_代金券及推薦碼_財務-阿裏雲
- 導讀__產品簡介_大數據計算服務-阿裏雲
- 升級為專業版__使用手冊_移動安全-阿裏雲
- 源站保護__常見接入問題_Web 應用防火牆-阿裏雲
- 全靠內地市場大 阿裏雲市場份額超Google 成全球第三
- 步驟 2:創建Linux實例__快速入門(Linux)_雲服務器 ECS-阿裏雲
- 概覽__常見日誌格式_用戶指南_日誌服務-阿裏雲
- 2016雲棲大會:阿裏雲發布首個基於生態體係的一站式域名服務平台
相關內容
- 常見錯誤說明__附錄_大數據計算服務-阿裏雲
- 發送短信接口__API使用手冊_短信服務-阿裏雲
- 接口文檔__Android_安全組件教程_移動安全-阿裏雲
- 運營商錯誤碼(聯通)__常見問題_短信服務-阿裏雲
- 設置短信模板__使用手冊_短信服務-阿裏雲
- OSS 權限問題及排查__常見錯誤及排除_最佳實踐_對象存儲 OSS-阿裏雲
- 消息通知__操作指南_批量計算-阿裏雲
- 設備端快速接入(MQTT)__快速開始_阿裏雲物聯網套件-阿裏雲
- 查詢API調用流量數據__API管理相關接口_API_API 網關-阿裏雲
- 使用STS訪問__JavaScript-SDK_SDK 參考_對象存儲 OSS-阿裏雲